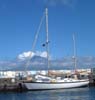
Sailing Vessel (SV) Sarah
Sarah has a new owner as of 7/26/2021. There will be no more updates to these SV Sarah pages
Sarah has a new owner as of 7/26/2021. There will be no more updates to these SV Sarah pages
| Solent Stay Upgrade |
|
An inner forestay provides an effective and sailor-friendly means to set a storm jib and bring the sail force in-board, closer to the boat's center of effort. It also can be used to add more sail area on reaches and runs. The effectiveness of this sail platform at least partly explains why nearly all of the recent cruising designs are cutter rigged. I intend to retro-fit an inner forestay on Sarah before I head off-shore again. The problem with an inner-forestay retro-fit is that existing rigging normally is not set up to take pressure of the stay on an unsupported area of the mast, and requires the addition of running backstays to provide the necessary support. A Solent Stay is an inner-forestay variation where the inner-stay is attached to the mast very near the main forestay fitting (normally at the Black Band). In this arrangement the existing backstay provides the support for both the main and inner forestays, eliminating the need for runners. A Solent Stay is what I am developing for Sarah. Most of my development is based on the Inner Forestay Hal Sutphen installed on his Pearson 424, and the Solent Stay Jack & Patricia Tyler installed on their 424. |
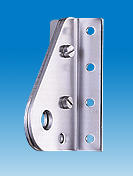
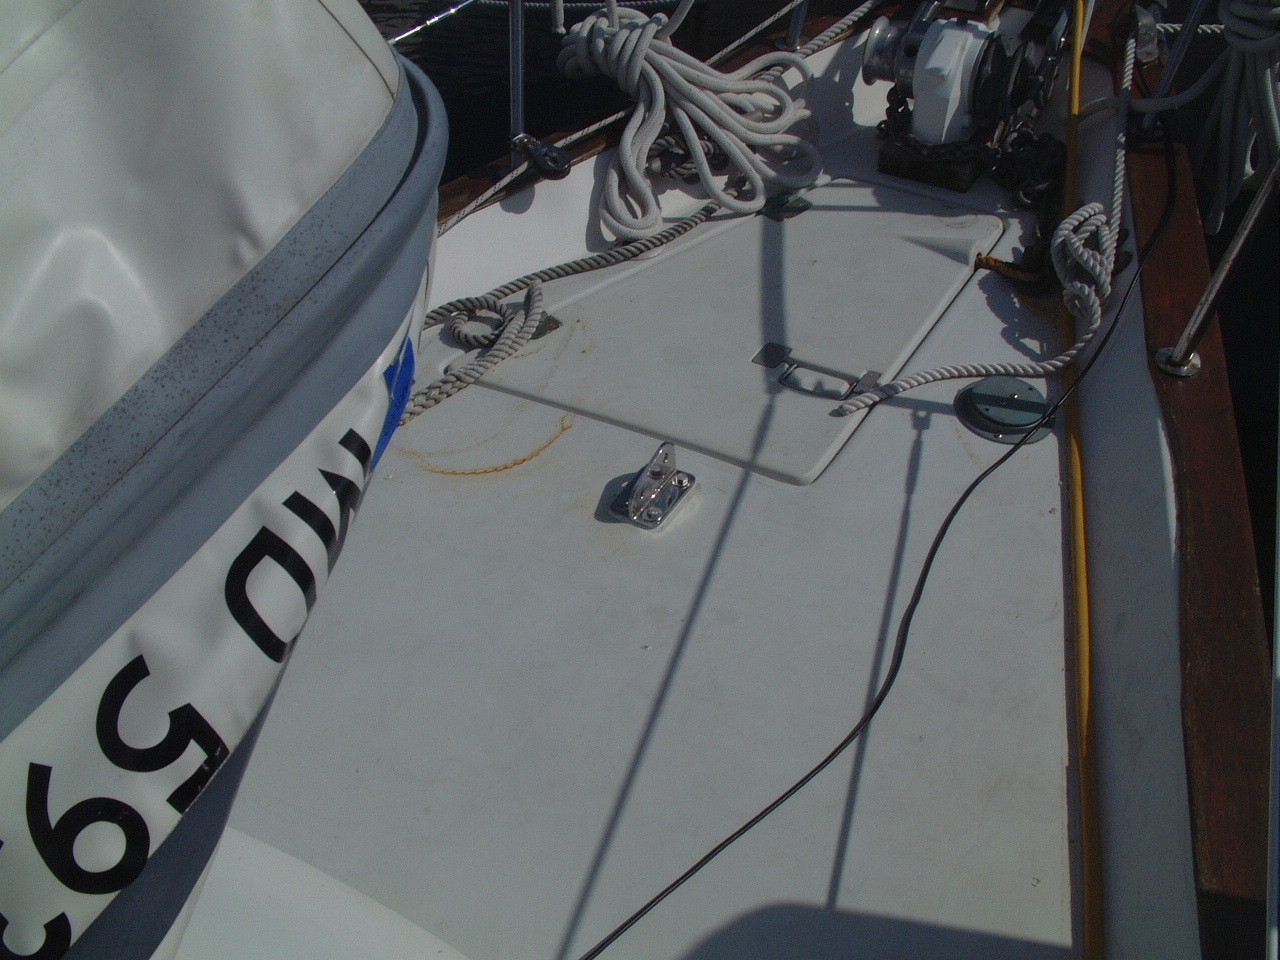
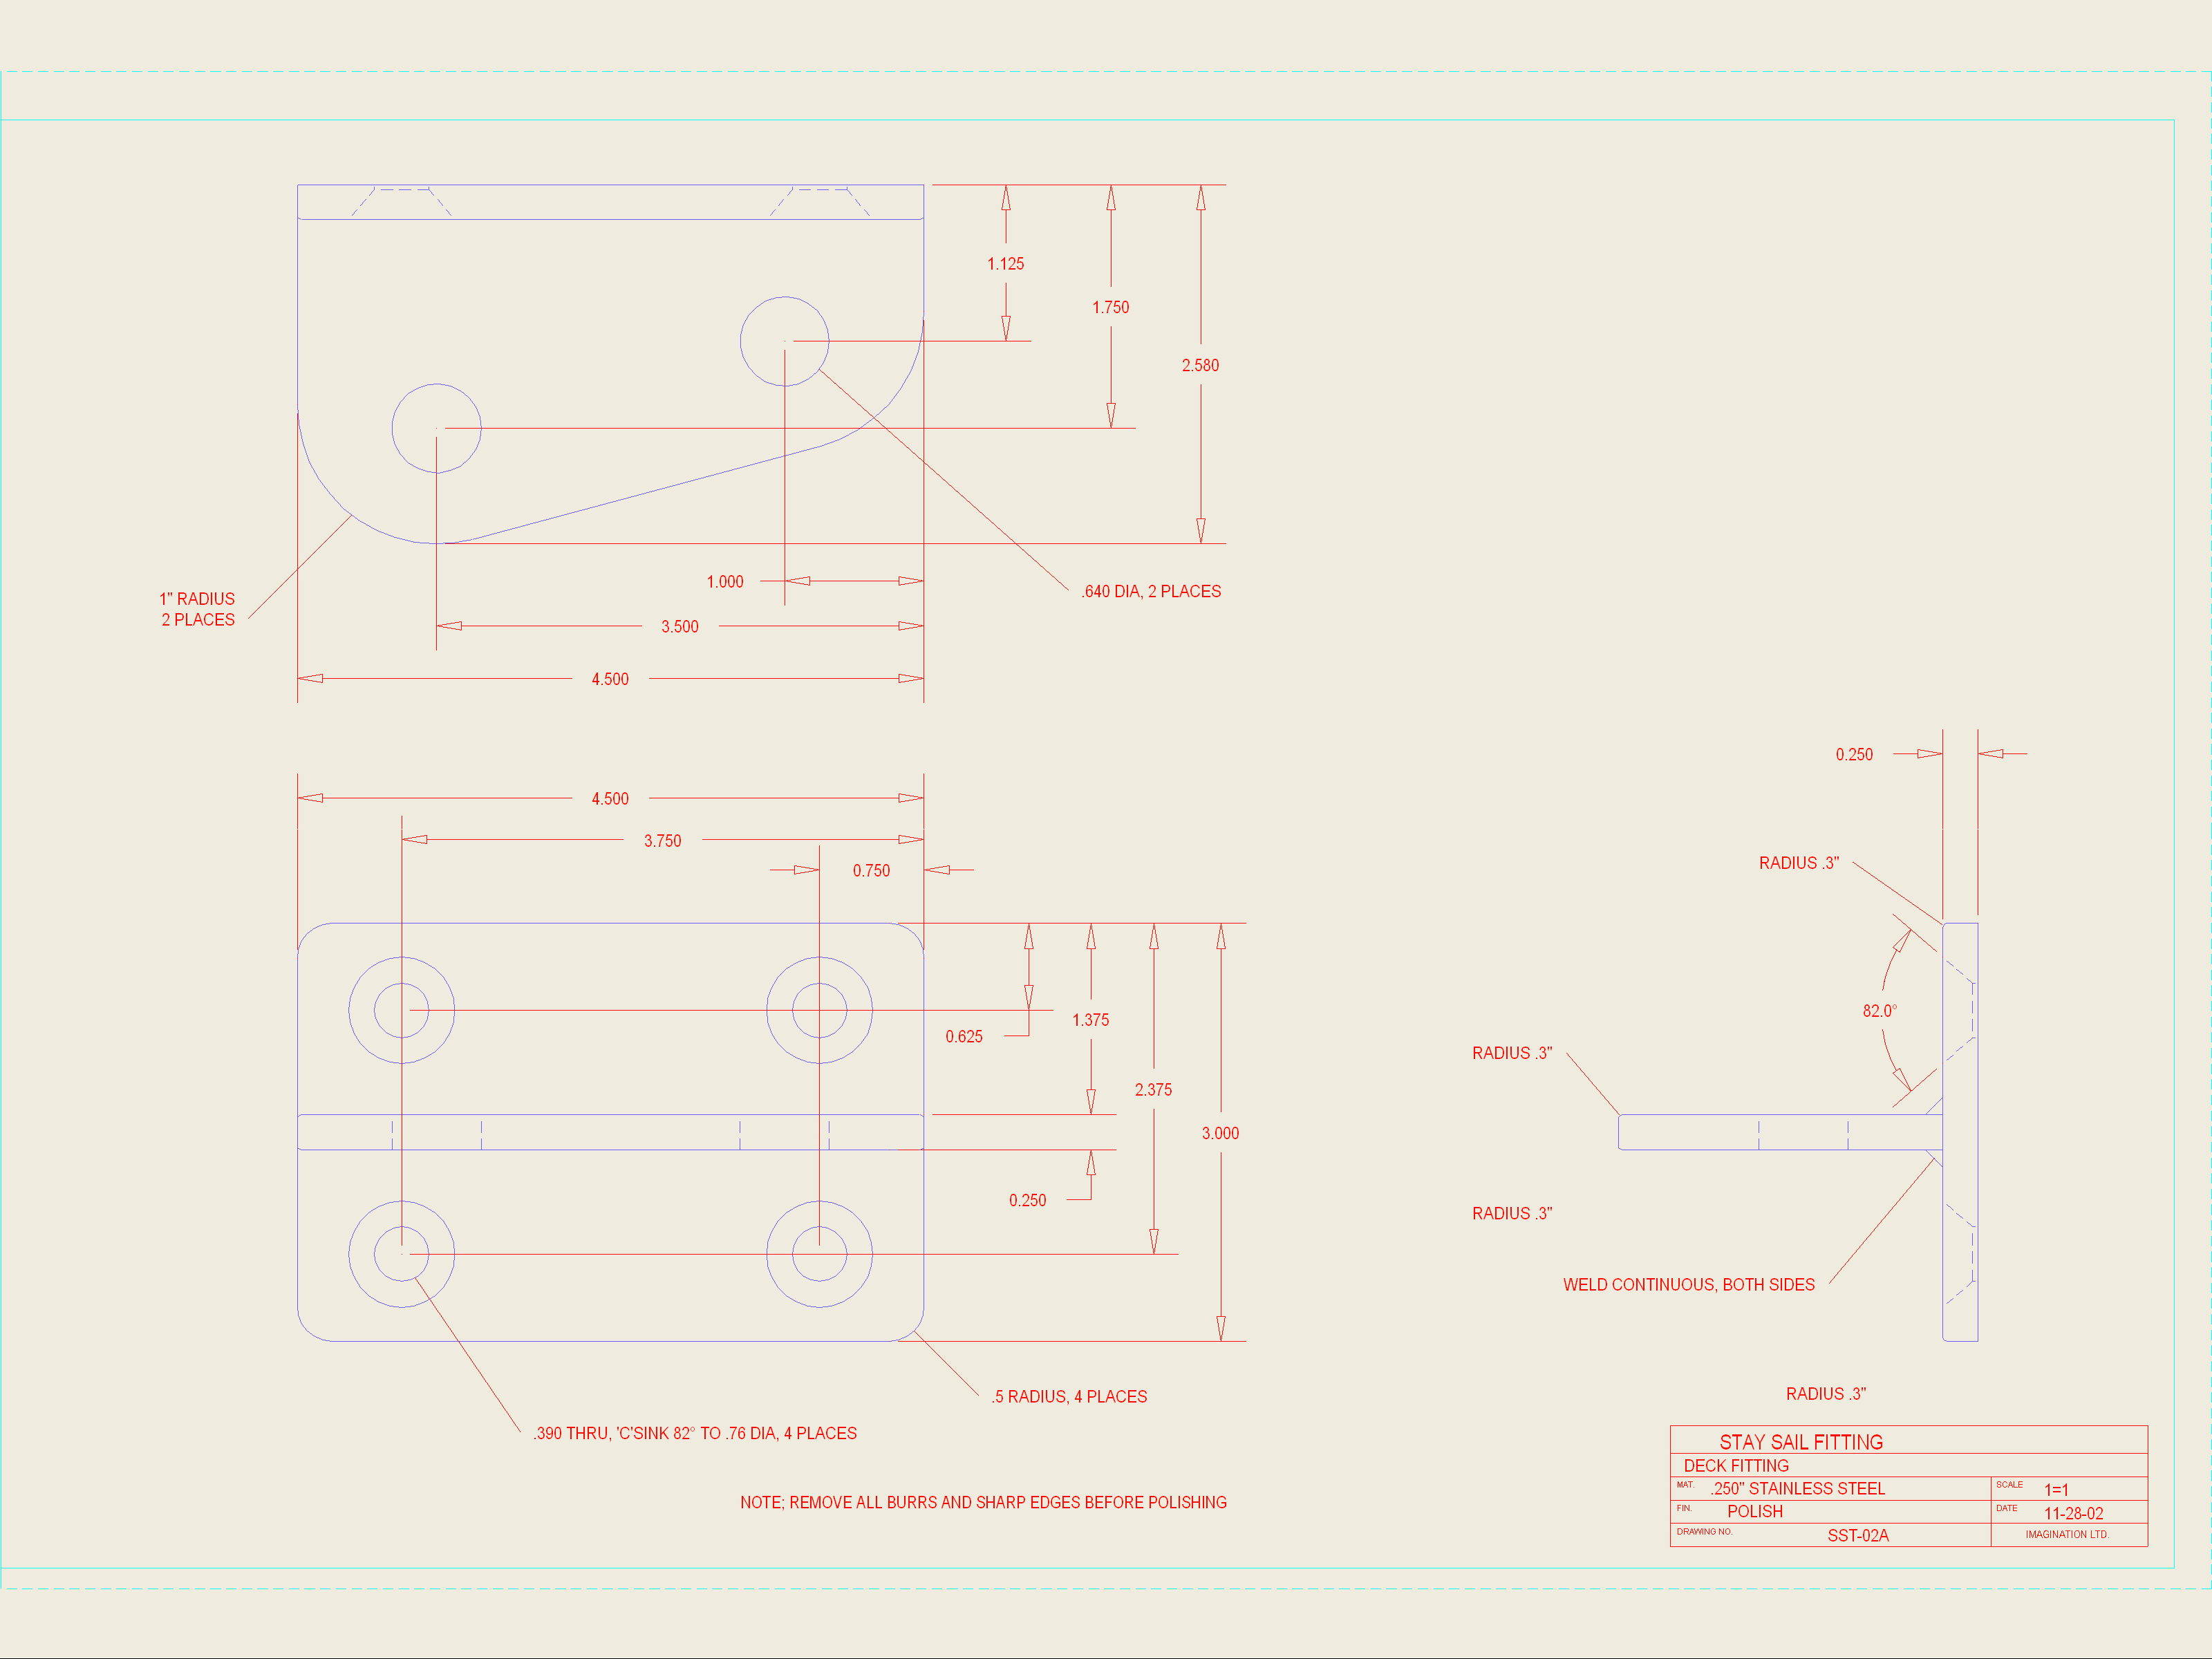
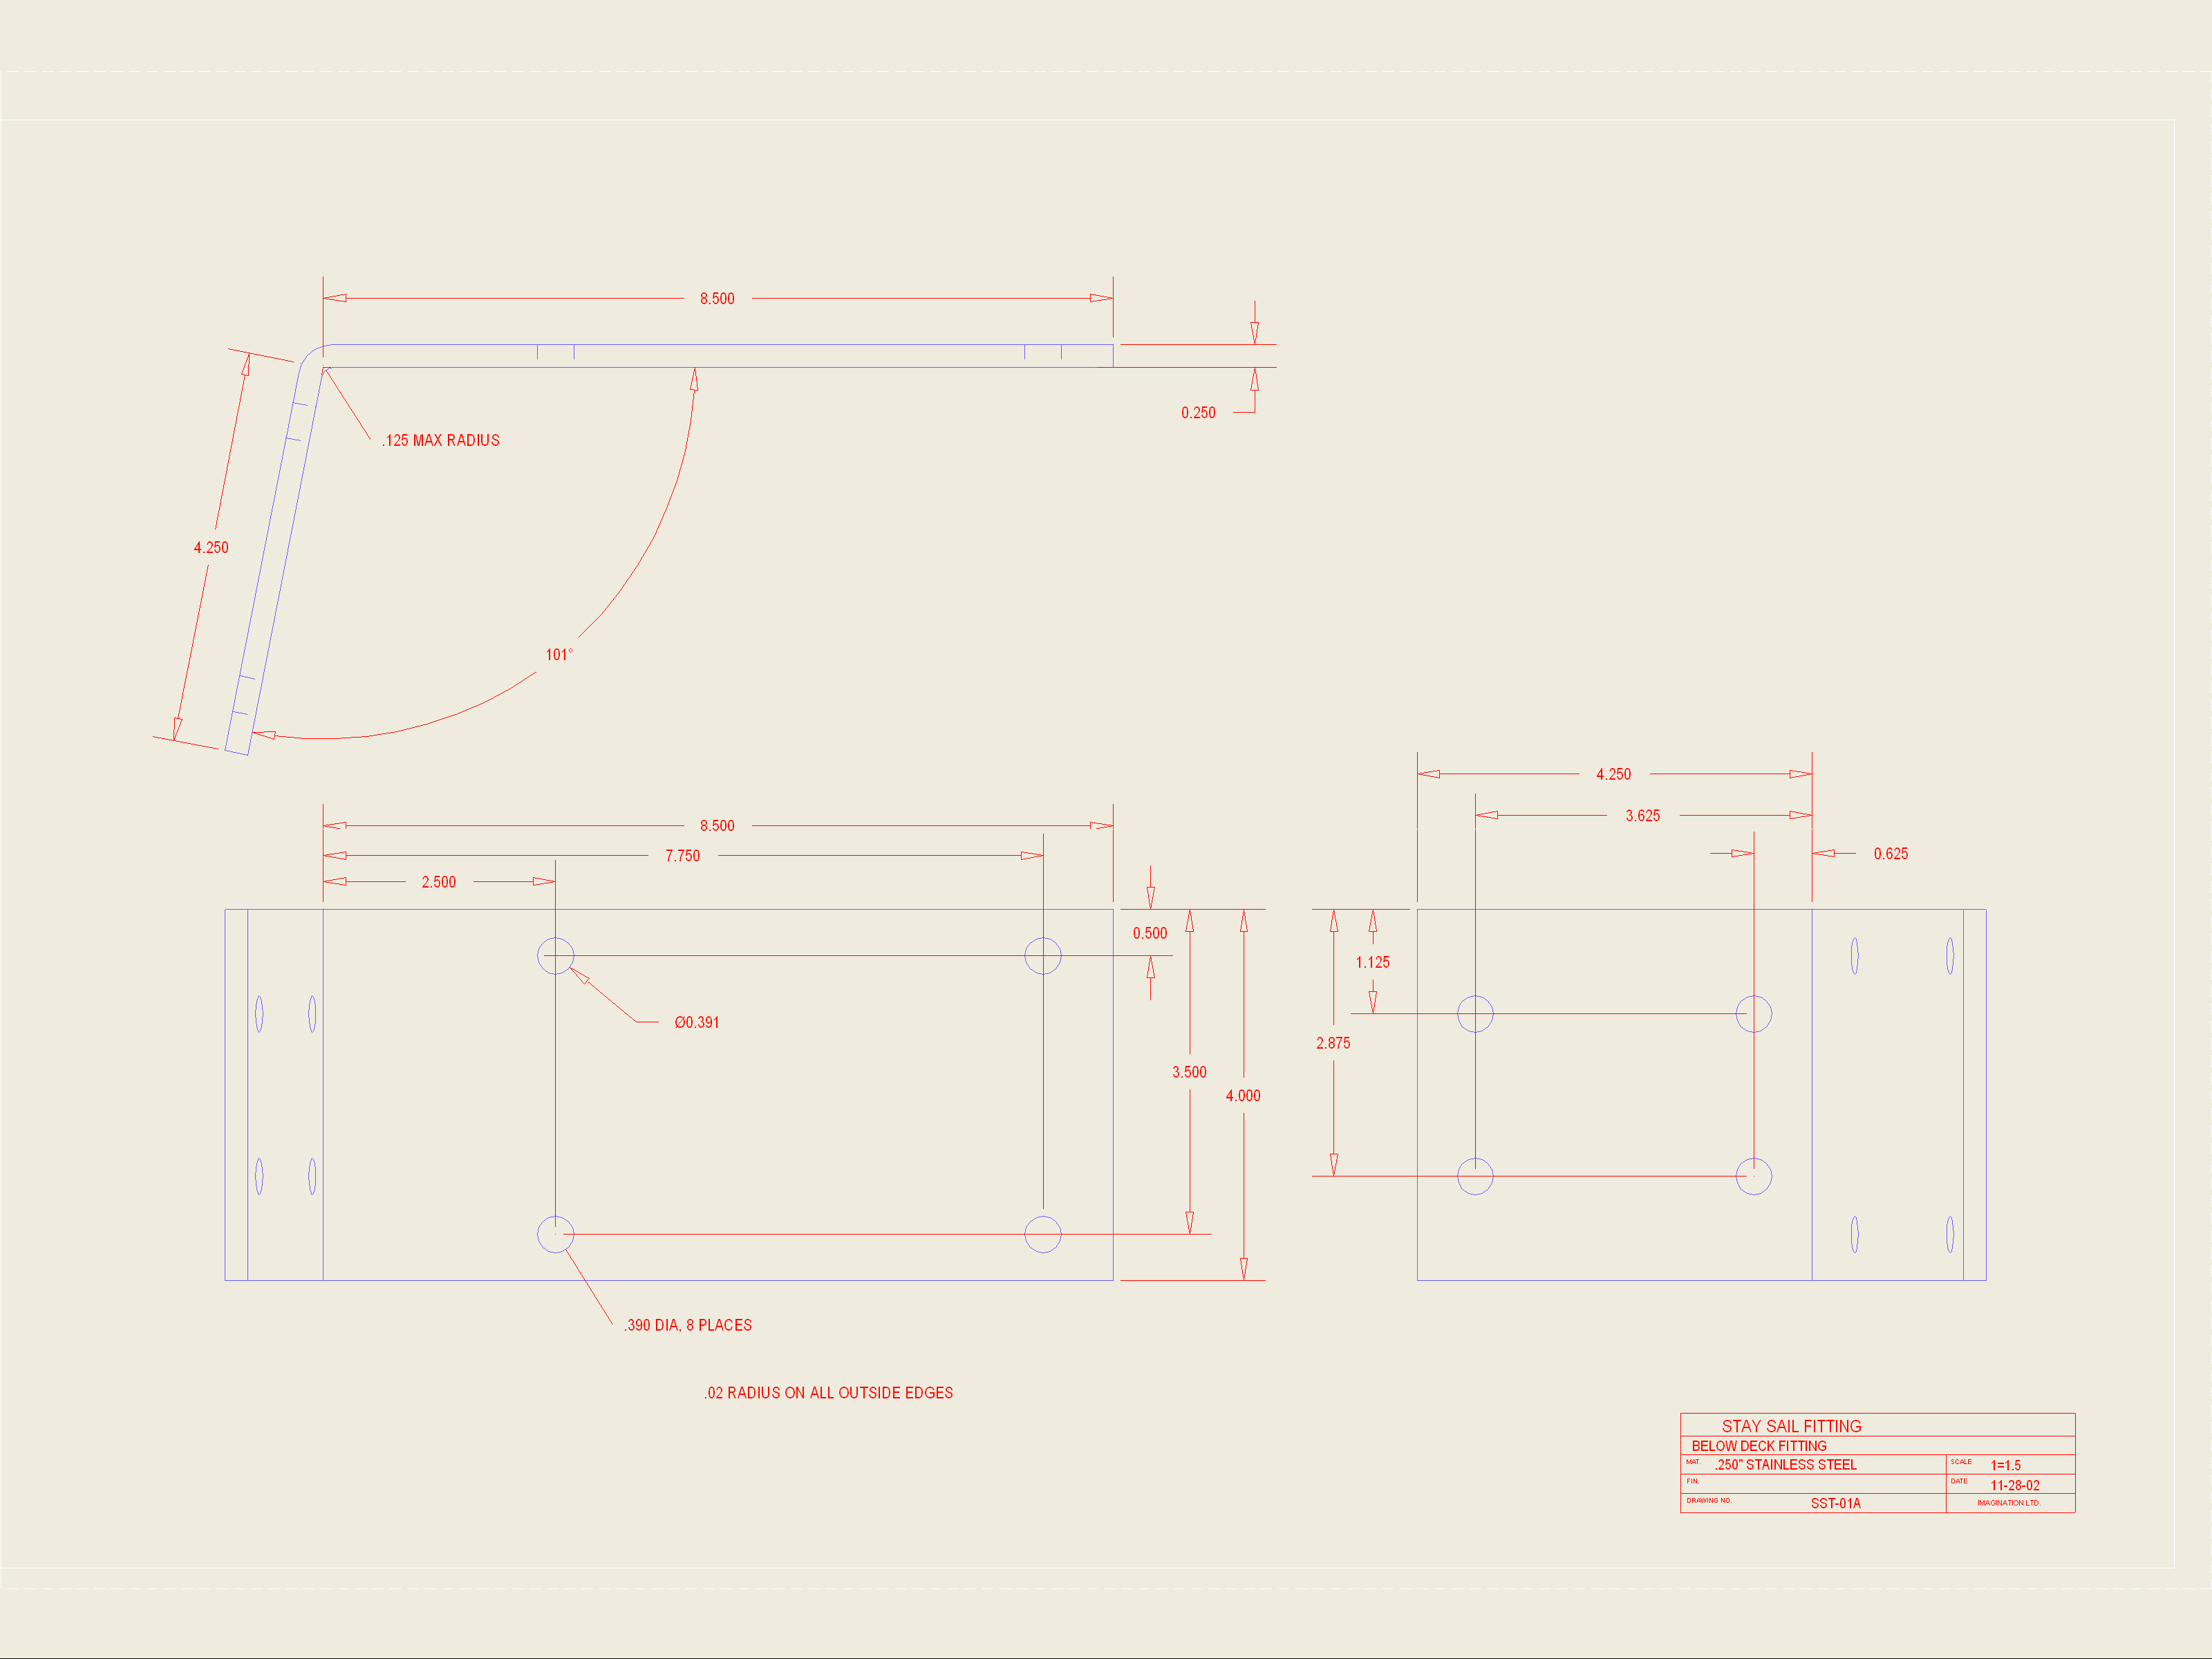
| The major task required to add a Solent Stay to
Sarah is fabricating and installing the deck fitting to which the bottom end
of the stay will be attached. Below are copies of AutoCAD drawings of the
fitting and the backing plate for the fitting. The deck fitting was
installed just aft of the on-deck anchor well. The Backing Plate
transmitted the upward force of the stay to the anchor well bulkhead, which
probably should
be reinforced with additional fiberglass. The deck fitting and the backing
plate are bolted together through the deck. Click on the thumbnails of the drawing to see a full sized copy, or download the deck fitting and backing plate AutoCAD files and view them with the AutoCAD online viewer. |
|
Deck Fitting
Under Deck Backing Plate CAD drawings thanks to Jack Goodman |
| I used a Highfield lever to attach the stay to the deck fitting. All wire connections are be mechanical (STA-LOK or HI-MOD). I have developed a bill of materials for the Solent Stay below. I specified 1/4" wire (reduced from 9/32" in my earlier specification). |
| Bill of Materials | |
|---|---|
| Item Description | Manufacturer/Item # |
| SS Highfield Lever, 3/8" Wire | ABI 191544
|
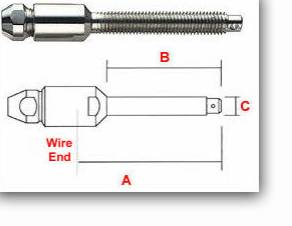
| 1/4' Wire Stud Terminal, 1/2" threaded stud |
STA-LOK 136-06-1/2
This terminal connects the Solent Stay wire to the Highfield Lever turnbuckle. This terminal will replace the standard swage terminal that comes with the ABI 2145CH Highfield lever, above. To the extent possible all wire fittings added to Sarah will be STA-LOKs.
Dimensions below.
A: 3 11/16" Update: I turned the rigging of the stay over to Mack Sails & Rigging in Stuart, FL. They preferred the Hayn Hi-Mod terminals, so that is what we used. These also non-swaged fittings, similar to STA-LOKs, of a newer design that seems to be gaining favor with many riggers. |
| 1/4" Wire Toggle Fork Terminal, 1/2" Pin |
STA-LOK 150-06 This terminal connects the Solent Stay wire to the masthead tang (Wichard 9150, below) I decided to go with a toggle fork terminal rather than the fixed terminal (134-07) I previously specified. I think this terminal will make it easier to lead the Solent Stay outboard when it is disconnected.
Dimensions below.
A: 2 19/32" Update: I turned the rigging of the stay over to Mack Sails & Rigging in Stuart, FL. They preferred the Hayn Hi-Mod terminals, so that is what we used. These also non-swaged fittings, similar to STA-LOKs, of a newer design that seems to be gaining favor with many riggers. |
| Halyard Block |
 Schaefer 704-05 Schaefer 704-05This block is for the Solent Stay halyard. It is be attached to the smaller pin hole in the mast tang, below.
Update: The upset shackel is not deep enough to fit the Wichard 9150, below. I ended up using two D-shackles. |
| Halyard Block Mast Tang |
 Wichard 9150 Wichard 9150This tang provides the attachment point for the Solent Stay to the mast as well as the attachment for the halyard block. The fitting hole for the fork terminal attachment is 3/4", which is much larger than the 1/2" pin on the fork terminal (STA-LOK 150-06) specified above. Therefore I will need to use a bushing to reduce the diameter of the hole on the tang. |
| Storage Plate for Stay (When Not In use) |
 54-500 54-500Update: I purchased this item from RigRite, but did not installed it. It is really designed to be attached to the side of Dorade box or cabin trunk, neither of which works well on Sarah. Instead I secured the stay to the Genoa track with a shackles and a track car, as shown here. |
| Whoosh's Solent Stay |
 On
the right is a picture of the deck and mast fittings Jack Tyler had
fabricated for Whoosh. I have decided to go with a commercially produced
mast fitting (Wichard), but I can only hope my deck fitting comes out as
well as Jack's. On
the right is a picture of the deck and mast fittings Jack Tyler had
fabricated for Whoosh. I have decided to go with a commercially produced
mast fitting (Wichard), but I can only hope my deck fitting comes out as
well as Jack's.
|
| Caurus' Solent Stay |
 In addition to tracking Jack Tyler's installation
progress and using Hal Sutphen's installation notes, I steal ideas wherever
I can find them. I've rafted with Dick and Gail Juppenlatz's Nautical 40,
Caurus, for over 12 years and only last year did I notice that they have
a Solent Stay. It is normally lashed to the rail, as an inner stay is more
of nuisance than a help on the Chesapeake Bay. On the Bay we spend a lot
more time short tacking in light winds rather than beating into 25 kts.
apparent. Finally one weekend, after I started to develop the Solent Stay
design for Sarah, we were rafted up in
Rollins Cove. I looked up Caurus' mast. Noticed the inner stay.
Stared at it for a while, then suddenly realized it was a Solent Stay. Below
are some pictures I took that weekend. One more source of inspiration. In addition to tracking Jack Tyler's installation
progress and using Hal Sutphen's installation notes, I steal ideas wherever
I can find them. I've rafted with Dick and Gail Juppenlatz's Nautical 40,
Caurus, for over 12 years and only last year did I notice that they have
a Solent Stay. It is normally lashed to the rail, as an inner stay is more
of nuisance than a help on the Chesapeake Bay. On the Bay we spend a lot
more time short tacking in light winds rather than beating into 25 kts.
apparent. Finally one weekend, after I started to develop the Solent Stay
design for Sarah, we were rafted up in
Rollins Cove. I looked up Caurus' mast. Noticed the inner stay.
Stared at it for a while, then suddenly realized it was a Solent Stay. Below
are some pictures I took that weekend. One more source of inspiration.
|
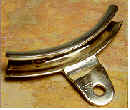
 Above left is the deck fitting into which Caurus'
Solent Stay is attached. There is a T-Ball fitting on the end of the stay
(partially shown on the right) which is inserted and locked into this deck
fitting. Then the turnbuckle on the stay must be tightened. For Sarah I
have planned a Highfield Lever secured to my deck fitting with a clevis
pin. I will still need to tension the stay with a turnbuckle (built into
the lever). My implementation will take a little longer to set up than
Dick's, but I intend to have it set up prior to each long distance cruise
and stored for day sailing. So I think this will be only a minor
inconvenience, and won't impede me from using this sail plan option. Above left is the deck fitting into which Caurus'
Solent Stay is attached. There is a T-Ball fitting on the end of the stay
(partially shown on the right) which is inserted and locked into this deck
fitting. Then the turnbuckle on the stay must be tightened. For Sarah I
have planned a Highfield Lever secured to my deck fitting with a clevis
pin. I will still need to tension the stay with a turnbuckle (built into
the lever). My implementation will take a little longer to set up than
Dick's, but I intend to have it set up prior to each long distance cruise
and stored for day sailing. So I think this will be only a minor
inconvenience, and won't impede me from using this sail plan option. |
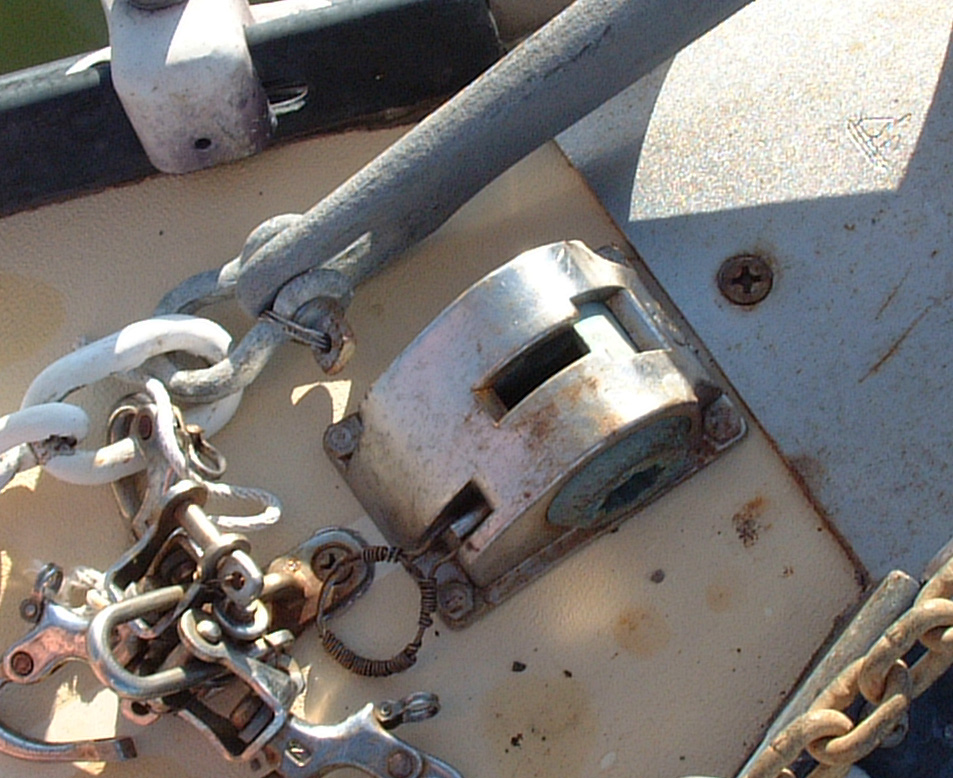
 On
the left is a picture of the Solent Stay attachment to Caurus' mast. This
looks like a T-Ball terminal on the mast. For a while I thought to use a
similar fitting on Sarah. I believe the T-Ball will allow the stay to be
swung out of the way without putting a hard bend on the stay cable. It
should also allow the stay to be removed and re-installed without great
effort (other than the trip up the mast). On
the left is a picture of the Solent Stay attachment to Caurus' mast. This
looks like a T-Ball terminal on the mast. For a while I thought to use a
similar fitting on Sarah. I believe the T-Ball will allow the stay to be
swung out of the way without putting a hard bend on the stay cable. It
should also allow the stay to be removed and re-installed without great
effort (other than the trip up the mast).In the end I went with the simplicity of the Wichard fitting, which is installed on the mast waiting for me to have the deck fitting and stay fabricated.
|
| Sarah's Solent Stay |
I didn't start work on the Solent Stay until after I moved
Sarah to Fort Pierce, FL. In January of 2005 I turned all fabrication work
(deck bracket and rigging) to Mack Sails/Rigging of Stuart, FL. There was a
long backlog at the machine shop for the bracket fabrication and the initial
work did not conform to the drawing I provided (see above). Finally by
mid-March I had the deck bracket and was able to complete the installation.
 This
bracket is nearly identical to the one Jack Tyler had fabricated for Whoosh
(see above and
Boat
Modifications for Europe). It should, I used his drawings and
documentation to develop my own. This
bracket is nearly identical to the one Jack Tyler had fabricated for Whoosh
(see above and
Boat
Modifications for Europe). It should, I used his drawings and
documentation to develop my own.I was very concerned about bolting a fitting that will come under a lot of load through the cored deck. In the past I have always drilled out the core to a larger diameter than the bolt, filled the space with thickened epoxy, then drilled the final hole through solid epoxy. I intended to do the same for this bracket; however I had great difficulty getting the through deck holes properly aligned with the above and below deck brackets. The below deck bracket determined the location of the above deck bracket as the below deck bracket must be flush against the forward bulkhead. Once I had that bracket in position with through-bolts on the bulkhead I could mark the location of the through deck holes. Unfortunately the under deck surface in this area is neither flat nor even, making it difficult to drill parallel holes for the four bolts. I was lucky to get very close with three bolts and have the fourth off by only 1/4". I wasn't too worried by these holes being precise as they were just to locate the area from which I would remove the deck core and apply the epoxy. However, I was concerned about my ability to reproduce even this close an approximation for the holes once I started to drill through the cured epoxy. Jack and I discussed this via Skype (he and Patricia were still at St. Katherine's in London), and I learned he had the same problem, but did not consider replacing the deck core. He felt the bracket is large enough to spread the load on the deck and the real load would be transferred to the bulkhead via the under deck bracket. So there was no real danger of crushing or cracking the deck sandwich. He just wetted out the core surface in the holes with epoxy then bedded everything with a lot of compound.
The two holes just below the below deck bracket on the bulkhead were supposed to be for a backing plate on the other side. I originally drew this plate up so it would spread some of the load wider and lower on the bulkhead. I don't think it was really necessary, but why not. Unfortunately the machine shop also disregarded my drawings for this plate and put the holes in the wrong spots. I sent that back to be re-done, but instead of having them re-do it to my original drawings I thought there was an easy compromise that would just require them to drill two more holes in the plate. Unfortunately my quick check before returning the plate to the shop was not adequate. I did not realize until after I had drilled the holes in the bulkhead for the backing plate that it would not fit at the location. The bottom of the on deck anchor well interferes with this location. A plate to my original specifications would have fit. It's bad enough when I just get it wrong, it's worse when I get it right then screw it up. |
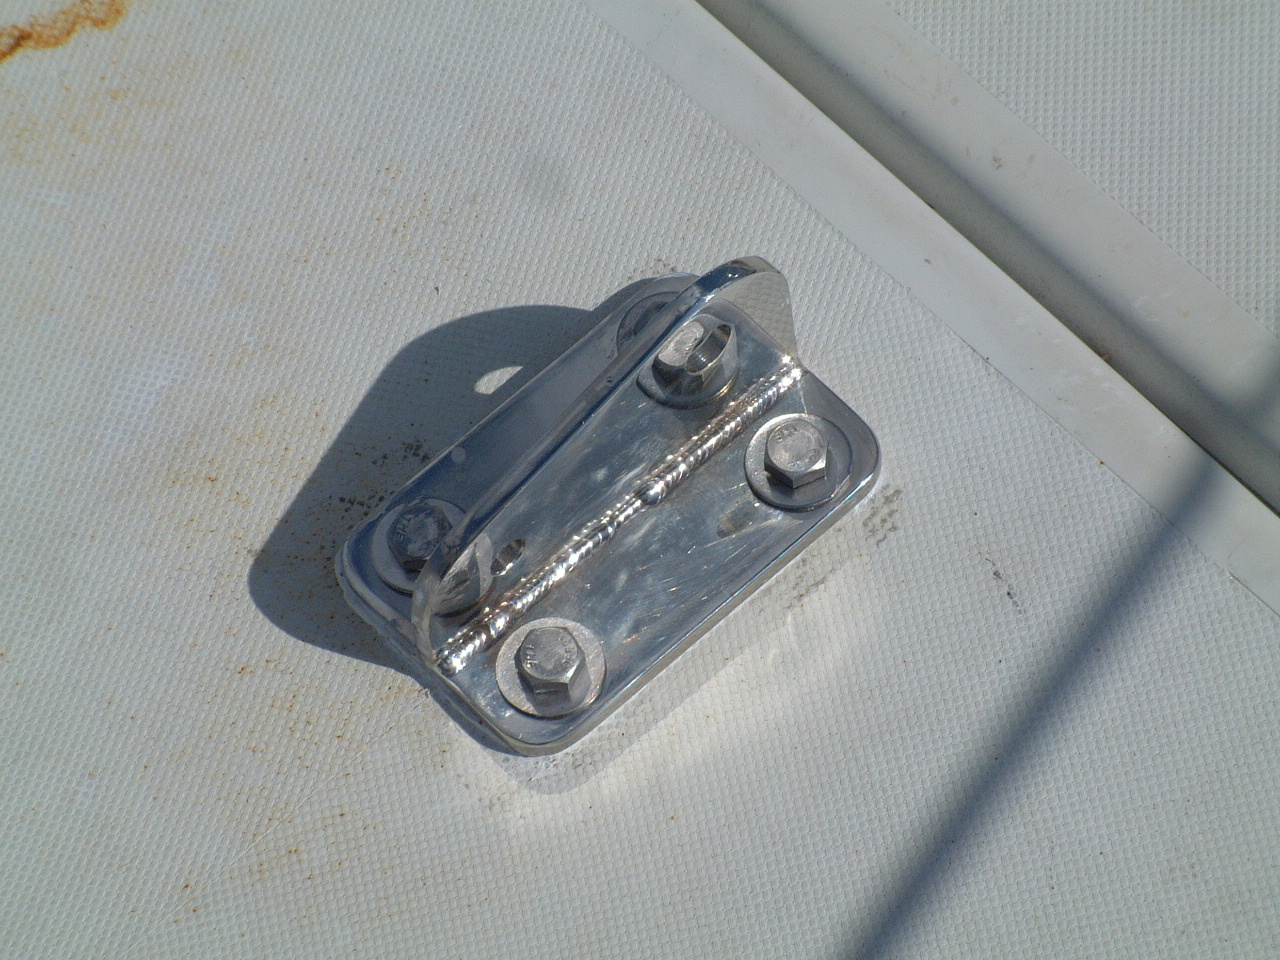
 The
picture on the left shows the upper bolts secured in the deck anchor well. The
picture on the left shows the upper bolts secured in the deck anchor well.With the completion of the installation of the bracket I am ready for Mack Sails/Rigging to return this Friday (March, 18) to complete the rigging work and take the measurements for a stay sail. |
 As of March 21, 2005 the Solent Stay is in place and the
halyard is run. The stay is barely visible in the picture on the
left. As of March 21, 2005 the Solent Stay is in place and the
halyard is run. The stay is barely visible in the picture on the
left. |
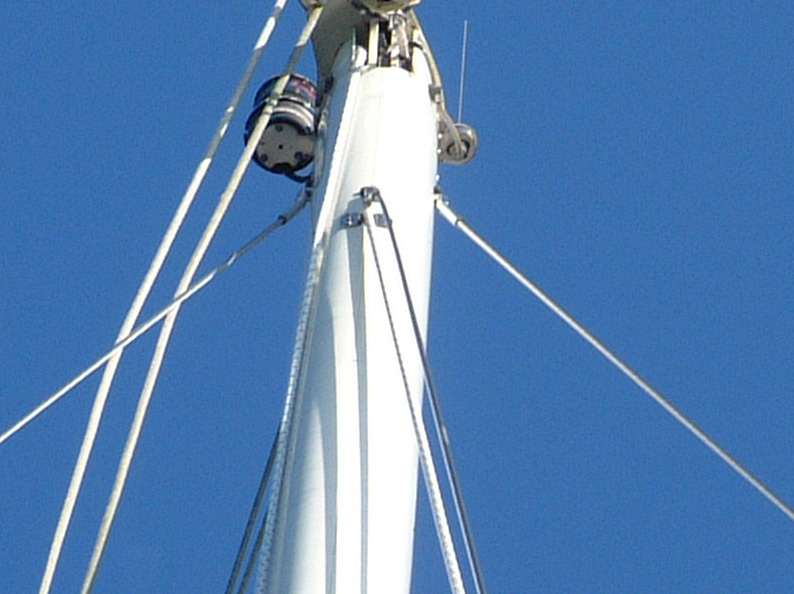
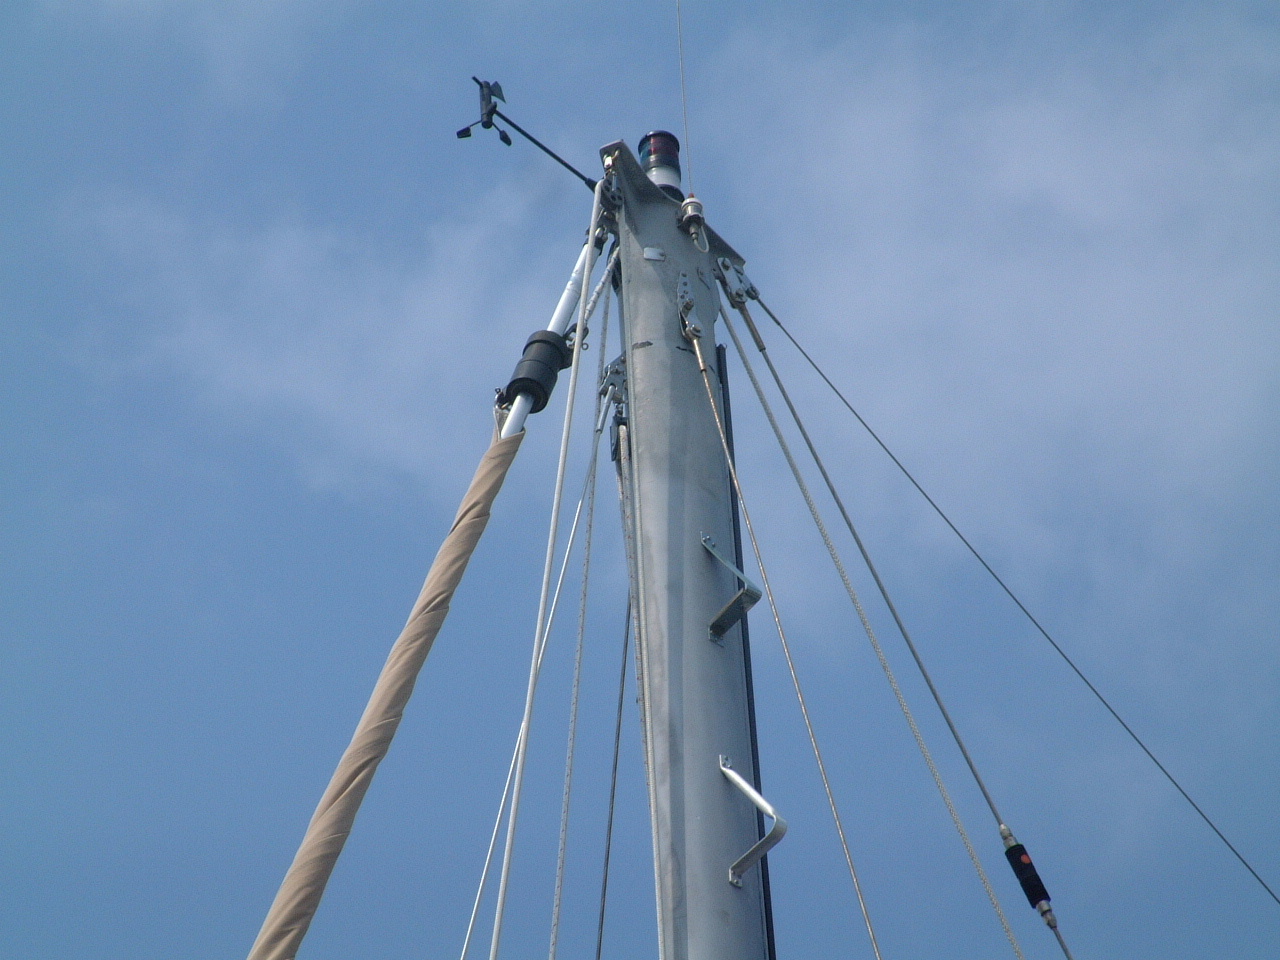 On
the right is a picture of the masthead showing the Wichard tang just
below the remnants of the black band. The stay is attached with
Hayn
HiMod fittings. The halyard block is one of the Lewmar swivel blocks I
removed from the mainsheet tackle. The halyard is 9/16" Sta-Set X, which I
previously used for the primary Genoa halyard. The upset shackle I intended
to use with this block did not fit on the tang. We had to use a D-Shackle
instead. This may still have to be changed. On
the right is a picture of the masthead showing the Wichard tang just
below the remnants of the black band. The stay is attached with
Hayn
HiMod fittings. The halyard block is one of the Lewmar swivel blocks I
removed from the mainsheet tackle. The halyard is 9/16" Sta-Set X, which I
previously used for the primary Genoa halyard. The upset shackle I intended
to use with this block did not fit on the tang. We had to use a D-Shackle
instead. This may still have to be changed. |
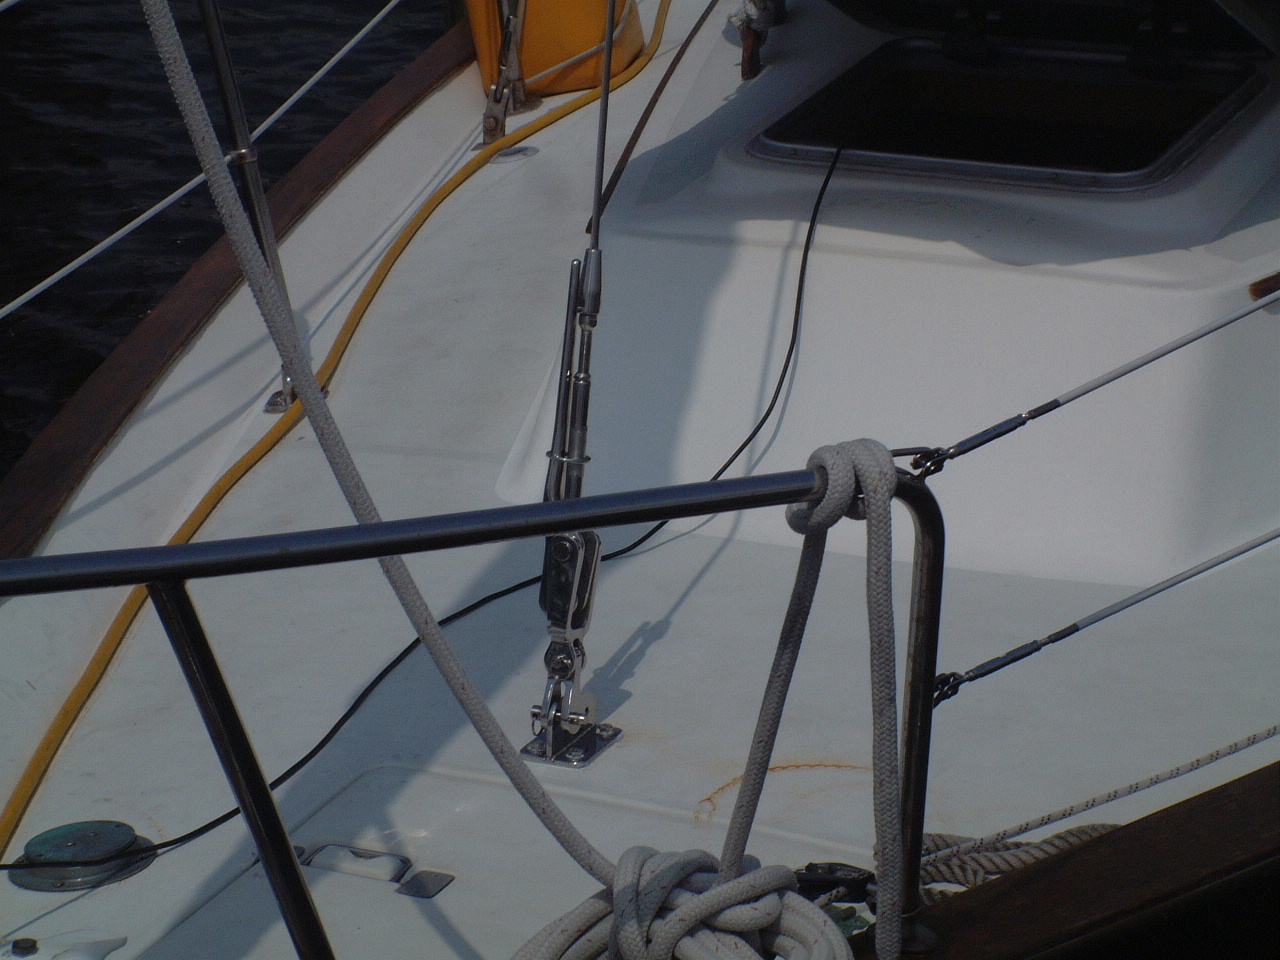
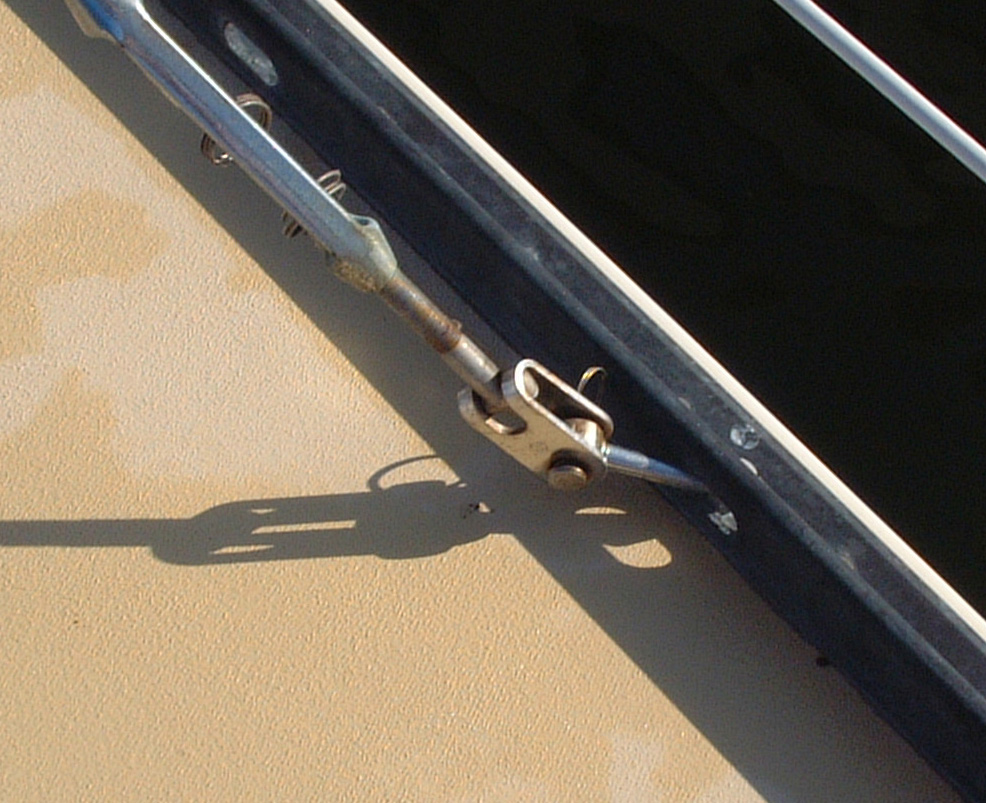
On the left is a picture of the ABI Highfield lever attached to the deck bracket. Mack Sails of Stuart, FL made a stay sail of approximately the same size as a P424 working jib to be set on this stay. The stay sail will normally stay on deck, hanked on to the Solent Stay in a deck bag. Mack Sails also modified my old ATN Storm Jib to allow it to be hanked onto this stay. |
|
I took this new rig and sail across the Atlantic twice and rarely used it. There were two problems.
Clearly tbe staysail needed to be recut and I needed to rig an inboard sheeting point. I started work on these modifications during my second year back in the states. I have started a separate web page to describe these modifications |
 Schaefer 78-70